🌱 Skill Trees
Skill trees are a combination of nodes which can be unlocked/levelled-up using skill tree points. Levelling up a skill tree node can give stats or can run some triggers for the player. You can also reset the progress for a skill tree and gain the skill tree points spent for it by using a skill tree reallocation point.
Skill Tree Basic Config Example
id: "custom_combat" # Unique Identifier for the Skill Tree
name: "Combat" # Name of the skill tree that will be displayed in the GUI
type: custom # See below for explanations
max-points-spent: 20 # Maximum amount of points spent in that skill tree
lore:
  - "&6This skill tree is used for combat abilities!"
icon: # The item representing the skill tree in the GUI.
  material: GOLDEN_AXE
  item_flags: [HIDE_ATTRIBUTES]
  #custom_model_data: 10
  #custom_model_data_string: 'test'
  #item_model: 'minecraft:dirt'

nodes:
  a1:
    name: "Mana Regeneration"
    coordinates: -3,-2
    paths:
      a2:
        path1: -2,-2
        path2: -1,-2

    max-level: 2
    is-root: true
    point-consumed: 1
    experience-table:
      first_table_item:
        level: 1
        triggers:
          - 'stat{stat="MANA_REGENERATION";amount=1;type="FLAT"}'
      second_table_item:
        level: 2
        triggers:
          - 'stat{stat="MANA_REGENERATION";amount=1;type="FLAT"}'
    lores:
      0:
        - "&eMana regen in pts/sec +1"
      1:
        - "&eMana regen in pts/sec +1"
      2:
        - "&eMana regen in pts/sec +1"
Linking a skill tree to a class
Skill trees are class-based, which means that the skill trees you can see and your progress for them depends on your current class. Each player can spend points in trees linked to its current class. You can link skill trees using the following syntax, inside any class configuration file:
# MMOCore/classes/mages.yml

skill-trees:
  - "skill-tree-id1"
  - "skill-tree-id2"
Skill Tree Points
You can use the following command to give skill tree points to players. The id represents the identifier of the skill tree you want to give points to. These points will only be usable for the corresponding skill tree. If you want to give skill tree points usable for any skill tree, use the id global.
/mmocore admin skill-tree-points give <player> <number> <id>One of the main ways you will be giving players skill tree points is through command triggers in experience tables. In the following example, a player will receive 1 skill tree point useable for the skill tree with ID archerSkillTree every time they level up.
# MMOCore/exp-tables/default_exp_tables.yml

example_archer_exp_table:
  give_one_skill_tree_point:
    period: 1
    triggers:
      - 'command{format="mmocore admin skill-tree-points give %player% archerSkillTree"}'
You can also use the following command to give skill tree reallocation points to players.
/mmocore admin skill-tree-realloc-points give <player> <number>Max Points Spent
This field corresponds to the maximum amount of points that a player can spend in a skill tree. If unspecified, there will be no limit to the amount of points a player can spend in the skill tree.
Nodes
A skill tree is comprised of multiple nodes. Nodes are what the player interact with in order to unlock new skills and perks. These nodes can either be linked together through paths, requirements and incompatibilities, or be independently leveled up. Players spend skill tree points on specific nodes in order to unlock/level them up.
The skill tree nodes go under the nodes subsection in the skill tree YML config.
Node States
A skill tree node can be in one of the five following states.
| State | Description |
|---|---|
| Unlocked | The node is at least at level 1 and is already unlocked |
| Maxed Out | The node has reached its maximum level. |
| Locked | The node is not accessible to the player yet, but might be in the future |
| Fully Locked | The player made a branching choice, rendering this node inaccessible unless a respec is performed |
| Unlockable | The node can be unlocked for N skill tree points |
You can modifiy the display name of each state in the node-status section in the gui/skill-tree.yml config file.
Coordinates
To be represented in the GUI, each skill tree node has unique coordinates defining where it will be displayed. The coordinates can be as large as you want (e.g x:15 y:0). You might have to move around in the GUI using the arrows to see nodes that are further way from the origin (x=0,y=0).
nodes:
  a1:
    name: '&6Extra Atk Damage'
    ...
    coordinates: 0,0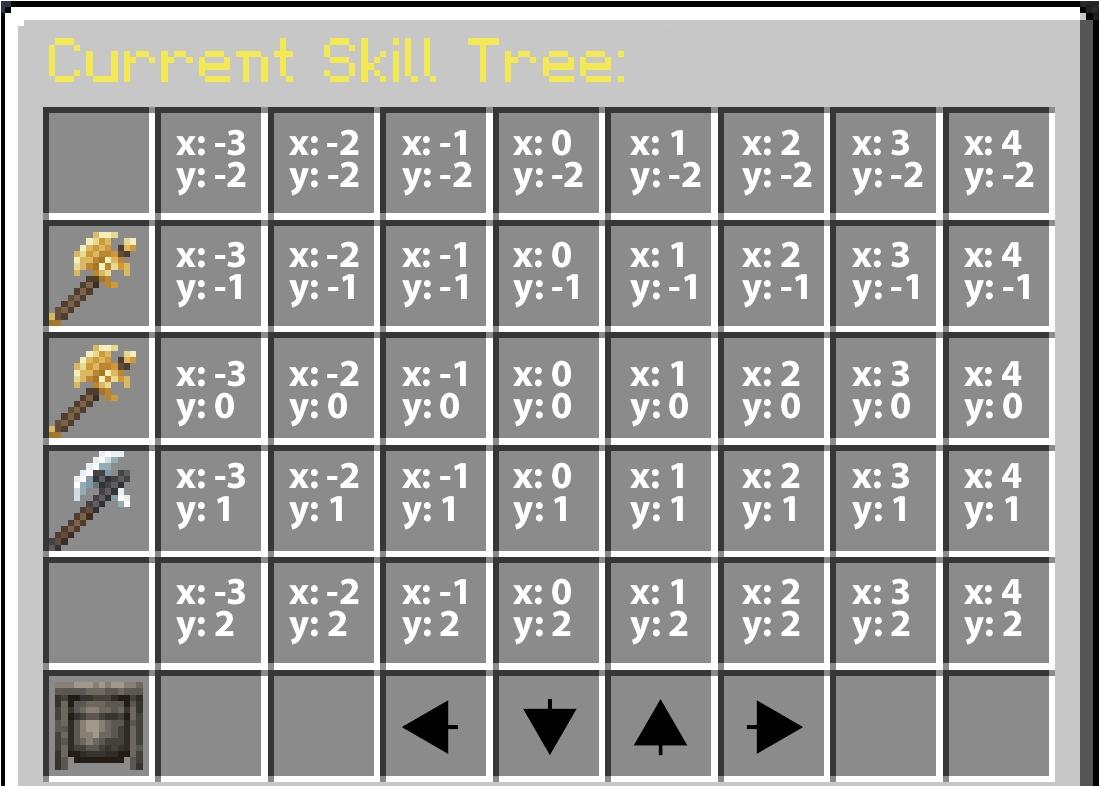
Parents (Strong)
All the strong parents of any node must be unlocked before that node can be unlocked.
Example 1
In the following example, a2, a3 and a4 are strong children of a1. In order to unlock a2, a3 or a4, the player must get a1 to level 2, 1 or 3 respectively.
nodes:
  a1:
    ...
    children:
      strong:
        a2:
          level: 2
        a3:
          level: 1
        a4:
          level: 3
  a2:
    ...
  a3:
    ...
  a4:
    ...
Example 2
In the following example, a1 is a strong parent of both a2 and a3. In order to unlock a2 or a3, the player must get a1 to level 2 or 1 respectively.
nodes:
  a1:
    ...
  a2:
    ...
    parents:
      strong:
        a1:
          level: 2
  a3:
    ...
    parents:
      strong:
        a1:
          level: 1
Parents (Soft)
Soft parents are similar to strong parents, except that you only need to unlock at least one soft parent, instead of all of them.
Example 1
In the following example, reaching level 3 of a1 is sufficient to unlock a2, and reaching level 2 of a1 is sufficient to unlock a3.
nodes:
  a1:
    ...
    children:
      soft:
        a2:
          level: 3
        a3:
          level: 2
  a2:
    ...
  a3:
    ...
Example 2
In the following example, in order to unlock a3, the player can either reach level 3 of a1 or level 2 of a2 (one suffices).
nodes:
  a1:
    ...
  a2:
    ...
  a3:
    ...
    children:
      soft:
        a1:
          level: 3
        a2:
          level: 2
If a node has both strong and soft parents, the requirements stack up. The player must unlock all the strong parent nodes, and at least one node among the soft parents.
INFO
Note that the children and parents options are pretty much symetrical. The following syntaxes are completely equivalent:
nodes:
  a1:
    ...
    children:
      strong:
        a2: 3
  a2:
...nodes:
a1:
...
a2:
...
parents:
strong:
a1: 3You can either define a2 as the child of a1, or a1 as the parent of a2. Both of these syntaxes will lead to the exact same behaviors.
For each node config, you can define parents and/or children, or none.
Incompatible Nodes
Nodes can be incompatible with each other, meaning that they permanently lock if other nodes have already been unlocked.
TIP
Although it is not its best use case, this feature can be used to recreate the max-children option (described below). It is most useful in specific cases where you have two distant nodes that introduce incompatibilities or bugs when used together.
In the following example, if a2 reaches level 1, or if a3 reaches level 2, a1 permanently locks (until a respec).
nodes:
  a1:
    name: '&6Extra Atk Damage'
    ...
    parents:
      incompatible:
        a2: 1
        a3: 2
Lore
The lore is displayed in the skill-tree GUI through the {node-lore} placeholder in gui/skill-tree.yml. If you want to fully customize the lore each node has, you can include in it all the placeholders that are used for the node item lore in gui/skill-tree.yml ({current-level}, {current-state}, {max-level}...).
Root Nodes
Root nodes are the first nodes to be unlocked in a skill tree. Note that skill trees should have at least one root node. To mark a node as a skill tree root, use the following syntax:
nodes:
  a1:
    name: '&6Some Node'
    ...
    root: true # Here!
TIP
It is possible for skill trees to have no root nodes, if you make sure some quest or event in your storyline unlocks the first skill tree node, through the use of a command for instance.
Permission Required
The option permission-required mandates that the corresponding permission is required to unlock the skill tree node. If this option is left unfilled, there will be no restrictions on permission to advance and unlock the skill tree node.
Maximum Children
Nodes work under a parent/children system. A node may only be available if all (or at least N) of its parents are unlocked. The max-children option allows you to limit the number of unlocked children a parent node can have.
This has the effect of creating a fork in the skill tree, where players need to choose between two different play styles.
In the following example, the node a1 has two children a2 and a3. Since max-children is set to 1, the player can only unlock one of the two. As soon as the player unlocks any of the two, the other will be permanently locked (until a respec).
nodes:
  a1:
    ...
    max-children: 1

  a2:
    ...
    parents:
      strong:
        a1:
          level: 1
  a3:
    ...
    parents:
        a1:
          level: 1
Experience Tables
Each node has an experience table associated with it. More about Experience Tables here
Node Display Options
The optional field display enables you to have a specific icon for the node depending on its state.
nodes:
  a1:
    ...
    display:
      unlocked: 'WHITE_CONCRETE:0'
      unlockable: 'BLUE_CONCRETE:0'
      locked: 'GRAY_CONCRETE:0'
      fully-locked: 'BLACK_CONCRETE:0'
Max Level
This is the maximum level you can reach for this skill tree node.
Points Consumed
The optional field point-consumed lets you set the number of skill tree points required to upgrade this skill tree node. It defaults to 1.
Paths
"Paths" are the connections in between nodes. They are only for visual representation, as players cannot directly interact with paths.
Any pair of (node, child) can have a path. A path consists in list of grid coordinates, that it should occupy inside the chest inventory.
States
A path can exist in three different states, which will modify its appearance. More information about these icons can be found here. A path is considered "unlocked" if both of the nodes it connects are also unlocked. If one of the two nodes is fully locked, the path is considered "fully-locked." Otherwise, the path is simply "locked."
Example
In the following example, the node a1 has two children a2 and a3. The a1 to a2 path occupies all grid coordinates in between these two nodes (same for x=1,y=0 and x=2,y=0). Same for the path from a1 to a3.
nodes:
  a1:
    ...
    coordinates: 0,0
    children:
      strong:
        a2:
          level: 1
          paths: ['1 0', '2 0']
        a3:
          level: 1
          paths: ['-1 0', '-2 0']
  a2:
    ...
    coordinates: 3,0
  a3:
    ...
    coordinates: -3,0
Paths can take turn but cannot split. You cannot have one node linked to multiple other nodes using a single path. You must have one path per (node, parent) pair.
Icons
You have the ability to fully customize the appearance of the skill tree graphical user interface (GUI) by creating different displays for each possible node or path configuration. To make these changes, you can modify the file located in gui/skill-tree.yml, which will automatically select the appropriate display for each node or path. This configuration can also be done in each skill-tree config in order to have different GUI display for each skill-tree. As stated above each node can have its own look by filling the display section for it.
Here is how the display will be chosen for a node / path:
- If it is a node and has a specific display corresponding to its state then this will be its display.
- Else if there is a display in the skill tree config it will take it.
- Else it will take the display specified in
gui/skill-tree.yml.
Let's now dive in how the display section works in the skill-tree config and gui/skill-tree.yml:
The display of a node/ path depends on both its neighborhood and its state. You can for example define a display for each node in the unlocked state and with 2 path at its left and right by being in nodes.unlocked.right-left.
The process is exactly the same for paths with 4 possible state for each path:
- Unlocked if the 2 node it links are unlocked.
- Unlockable if one node is unlocked while the other is unlockable.
- Locked if one of the 2 nodes is locked.
- Fully locked if one of the 2 nodes is fully locked.
The neighborhood also impacts the display of a path. For instance, if a path has a branch that goes up and ones that goes right, it will take the item associated with "up," followed by "down-right," and finally "right." This is a symmetrical process, so if a path goes left and then down, it will look identical.
The same rule applies for nodes. For example, if a node is surrounded by four paths, it will display the "up-right-down-left" configuration. Alternatively, if a node has only three paths (up, left, and right), it will automatically select the "up-right-left" display.
Here is a full example to show what the display enables you to do:
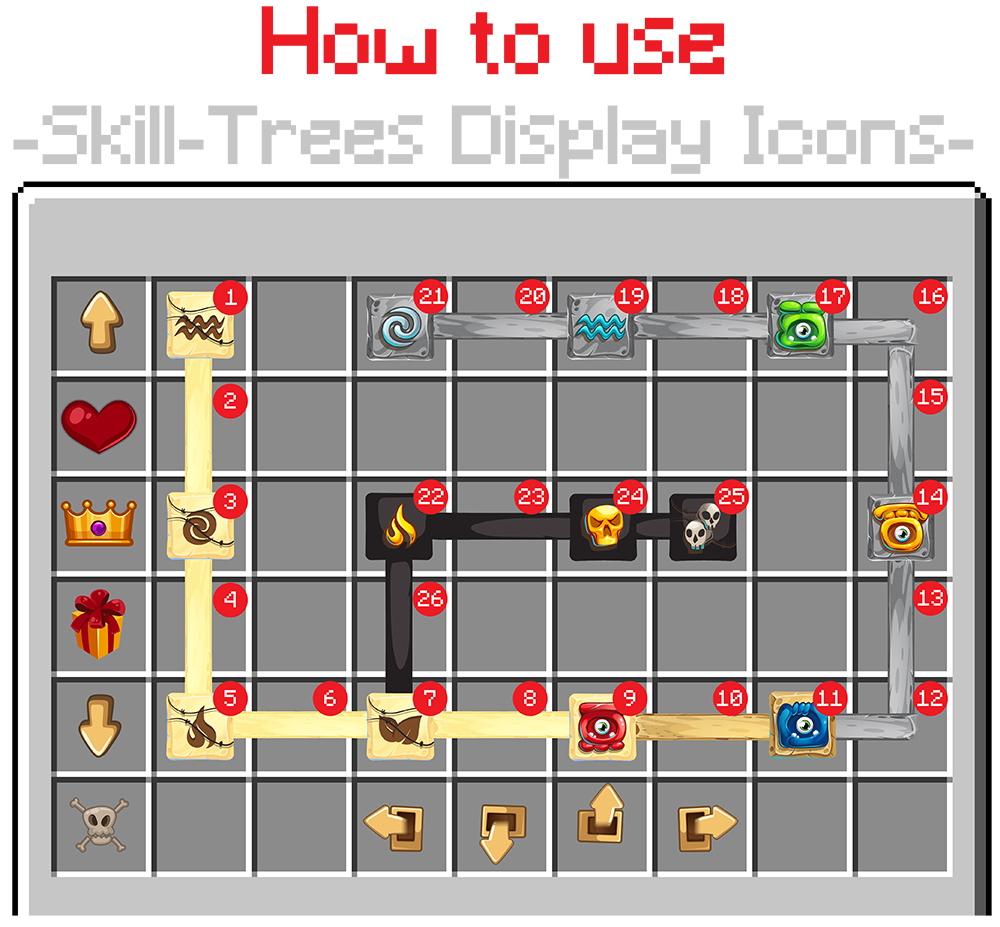
| No | Display Icon | No | Display Icon | No | Display Icon | No | Display Icon |
|---|---|---|---|---|---|---|---|
| 1 | unlocked:down | 8 | unlocked:right | 15 | locked:up | 22 | fully-locked:down-right |
| 2 | unlocked:up (same as down as this is symetric) | 9 | unlocked:right-left | 16 | locked:down-left | 23 | fully-locked:right |
| 3 | unlocked:up-down | 10 | unlockable:right | 17 | locked:right-left | 24 | fully-locked:right-left |
| 4 | unlocked:up | 11 | unlockable: right-left | 18 | locked:right | 25 | fully-locked:left |
| 5 | unlocked:up-right | 12 | locked:up-left | 19 | locked:right-left | 26 | fully-locked:up |
| 6 | unlocked:right | 13 | locked:up | 20 | locked:right | ||
| 7 | unlocked:up-right-left | 14 | locked:up-down | 21 | locked:right |
# Example config in skill-tree.yml or in skill-tree configs.
display:
  paths:
    unlocked:
      up: "WHITE_DYE:0"
      up-right: "WHITE_DYE:0"
      up-left: "WHITE_DYE:0"
      down-right: "WHITE_DYE:0"
      down-left: "WHITE_DYE:0"
      right: "WHITE_DYE:0"
      default: "WHITE_DYE:0"
    locked: ...
    unlockable: ...
    fully-locked: ...
  nodes:
    unlocked:
      up-right-down-left: "WHITE_CONCRETE:0"
      up-right-down: "WHITE_CONCRETE:0"
      up-right-left: "WHITE_CONCRETE:0"
      up-down-left: "WHITE_CONCRETE:0"
      down-right-left: "WHITE_CONCRETE:0"
      up-right: "WHITE_CONCRETE:0"
      up-down: "WHITE_CONCRETE:0"
      up-left: "WHITE_CONCRETE:0"
      down-right: "WHITE_CONCRETE:0"
      down-left: "WHITE_CONCRETE:0"
      right-left: "WHITE_CONCRETE:0"
      right: "WHITE_CONCRETE:0"
      left: "WHITE_CONCRETE:0"
      up: "WHITE_CONCRETE:0"
      down: "WHITE_CONCRETE:0"
      no-path: "WHITE_CONCRETE:0"
    locked: ...
    unlockable: ...
    fully-locked: ...
Skill Tree GUI
There are 2 ways of opening a skill tree UI:
The first option is to use /skilltrees, which will open the GUI using the gui/skill-tree.yml configuration file. It allows you to browse through each skill tree within the GUI. You can enable or disable this feature by modifying the enable-global-skill-tree-gui field in the config.yml file.
The second option is to use /skilltrees to open a specific skill tree without the ability to browse between skill trees. This will utilize the GUI configuration file from gui/specific-skill-tree/specific-skill-tree-<skill-tree-id>.yml. Make sure that your skill tree IDs follow the YAML format to avoid any issues. If no configuration is found, it will load the GUI from gui/specific-skill-tree/specific-skill-tree-default.yml. You can also toggle this feature on or off by modifying the enable-specific-skill-tree-gui field in the config.yml file.
Skill Tree Types (MMOCore 1.21.1+)
There are currently two types of skill trees. Using some type or another does not add, nor remove any feature from your skill tree, it only makes it easier to setup skill trees in certains scenarios, since skill tree config files can quickly get big.
Custom Skill Trees
If you don't specify the type option for a skill tree, it will be set to CUSTOM by default. When using a custom skill tree, you need to manually provide all relations between skill tree nodes, as well as the location of all the paths between the nodes. In order to create a custom skill tree, simply use the following syntax:
id: "sample_skill_ree"
name: "&6My Skill Tree"
type: CUSTOM # <<==== Here
...
MMOCore will automatically infer that skill tree nodes with NO parents whatsoever are root nodes.
Proximity Skill trees
Proximity skill trees are a simplified version of custom skill trees where you sometimes don't need to provide parenting relations between the nodes. In order to create a proximity skill tree, change the type config option to PROXIMITY inside your skill tree config file.
id: "sample_skill_ree"
name: "&6My Skill Tree"
type: PROXIMITY # <<==== Here
...
Any two neighboring nodes are automatically marked as soft parents. In other words, leveling up any node automatically unlocks the neighboring nodes. Every skill tree node has four direct neighbors (up, down, left and right neighbor).
Some examples (click to expand):
These two nodes are parents as they are direct neighbors.
nodes:
  a1:
    name: 'Cooldown Reduction I'
    ...
    coordinates: 2,1

  a2:
    name: 'Cooldown Reduction II'
    ...
    coordinates: 2,2
These 2 nodes are NOT parents, as they are not direct neighbors.
nodes:
  a1:
    name: 'Cooldown Reduction I'
    ...
    coordinates: 2,1

  a2:
    name: 'Cooldown Reduction II'
    ...
    coordinates: 2,4
When setting up a proximity skill tree, you can still make use of custom soft/hard/incompatible node parenting rules as well as paths. Using a proximity skill tree simply gives you a skeleton for your skill tree and spares you some syntax.
Defining parents inside a proximity skill tree
nodes:
  a1:
    name: 'Cooldown Reduction I'
    ...
    coordinates: 2,1
    children: # This syntax still works.
      strong:
        a1: 1

  a2:
    name: 'Cooldown Reduction II'
    ...
    coordinates: 2,4
It is impossible for MMOCore to infer skill tree roots from a linked skill tree, because every non-isolated skill tree node has at least one parent/child node. For this reason, you need to specify at least one root node manually in your proximity skill tree! As a reminder, this is done using the following option:
nodes:
  a1:
    name: '&6Some Node'
    root: true # This option
    ...