🖼️ Item Tooltips
Tooltips are what players see when hovering an item inside any inventory. While vanilla Minecraft does feature an option to modify the tooltip texture of any item, this functionality is very limited (color only). Although it is also possible to manually setup custom tooltips without using the dedicated MMOItems feature, MMOItems makes it more systematic and very much easier.
Specific tooltips can be bound to items, tiers, item types or even item modifiers. Specific tooltips bound directly to items and modifiers have precedence over tooltips granted by item tiers, and item tiers also have tooltip precedence over item type tooltips.
General Principle & Examples
Tooltips are entirely based on custom fonts as well as the negative space font pack. MMOItems injects custom fonts inside the item display name and lore to give the impression of a tooltip background texture.
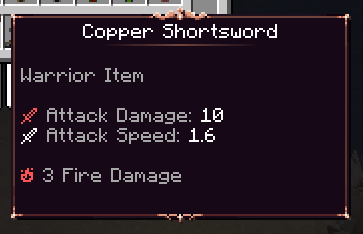
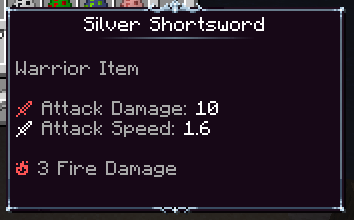
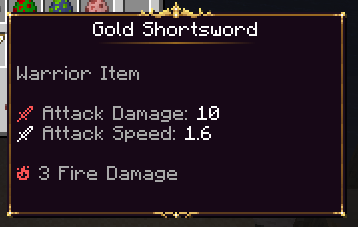
MMOItems provide three examples tooltip configs (see above). These tooltips utilize textures from the MMOItems Default Resource Pack, so make sure you download it and install it on your server beforehand. After installing this resource pack, give yourself the following items (these are all swords): TOOLTIP_COPPER_SWORD, TOOLTIP_SILVER_SWORD and TOOLTIP_GOLD_SWORD.
How to create custom tooltips
Head to the /tooltips folder in your main MMOItems folder. All tooltip configs should be placed inside this folder. One YAML file may contain multiple tooltip configs, and you can group configs inside subfolders to have an organized folder hierarchy.
There are three steps when creating custom tooltips for MMOItems:
- drawing the actual tooltip textures following the few constraints associated to using custom fonts,
- binding these textures to random unicode characters
- setting up the MMOItems config files.
For our tutorial, we will be using the following item (located inside the item/sword.yml config file).
GOLD_SWORD:
  base:
    material: GOLDEN_SWORD
    name: Gold Shortsword
    attack-damage: 10.0
    attack-speed: 1.6
    tooltip: GOLD # This is where you give your item a tooltip
    element:
      fire:
        damage: 3.0
    required-class:
    - Warrior
1/ Textures
The first step to creating custom tooltips is drawing the tooltip textures. Tooltip textures are split into three different textures:
- The
toptexture, which generally includes the item display name and optionally item type and tier, - The
middletexture, a very simple pattern that gets copy-n-pasted once for every extra line in the item lore, - The
bottomtexture, which is the bottom of the tooltip texture.
You can find below the tooltip textures of the default gold tooltip. Make sure that your textures are at most 255 pixels wide! This is the only major constraint when working with custom fonts.


When an item is being generated, MMOItems injects the top texture at the beginning of the item display name. It then injects the middle texture at the beginning of every lore line (except the last one). The last lore line instead receives the bottom texture. Negative space fonts are crucial here, as MMOItems use them to align text and textures.
As you might have realized, the width of these textures are static. Unlike vanilla tooltips which expand to the longest lore line of the item, custom tooltip textures do not expand. You need to hard-pick a width for your tooltips and make sure your lore lines do not clip out. This is a known limitation of the current tooltip system (which might be expanded later on to support multiple tooltip widths).
2/ Resource Pack Configs
Install your tooltip textures inside your resource pack. For this tutorial, let's pretend they are located inside the folder assets/tooltip_tutorial/textures/gold/.
First make sure your server resource pack includes the negative space font pack. Then, head to your assets/minecraft/font/default.json config and add the following entries to your font map.
{
    "providers": [
        {
            "type": "bitmap",
            "file": "tooltip_tutorial:gold/top.png",
            "ascent": 17,
            "height": 21,
            "chars": ["\u4070"]
        },
        {
            "type": "bitmap",
            "file": "tooltip_tutorial:gold/middle.png",
            "ascent": 8,
            "height": 10,
            "chars": ["\u4071"]
        },
        {
            "type": "bitmap",
            "file": "tooltip_tutorial:gold/bottom.png",
            "ascent": 8,
            "height": 17,
            "chars": ["\u4072"]
        },
    ]
}
As usual with custom fonts, there is one entry per texture.
- The
fileparameter corresponds to the path of your texture. Here, the namespace we chose for our textures/assets istooltip_tutorial, but it can be anything you want. - Make sure the
heightparameter exactly matches the height (in pixels) of your texture file, otherwise your in-game tooltip texture will look very weird. - The
ascentparameter must be fine-tuned in-game to make sure there are no gaps in your tooltip. First set it to something like half the height, reload your resource pack in-game and correct it. - The
charsfield is where you select the unicode char. Take some unicode char that you are not using yet and store it somewhere, as we will need it later when setting up MMOItems configs.
3/ MMOItems Configs
You will find below one of the three tooltip config included in the default MMOItems config files. These can be found in the tooltips/example_tooltips.yml config file.
gold:
  top:  "{-41sp}\u4070{-166sp}"
  middle: "{-41sp}\u4071{-166sp}"
  bottom: "{-41sp}\u4072"
  align_texture: 0 # Optional
  align_text: 0 # Optional
  center_top:
    display_name: true
    span: 161
    default_char_size: 5
    lore_lines: 1
    char_size: [f4, i1, k4, l2, t3, I3, "'1", ' 3', ',1', '(3', ')3']
    regex: "[a-zA-Z0-9 ',()+]"
Textures
top, middle and bottom is where you specify the unicode char used for your three textures. These options are the actual strings that will be injected into your item. These strings support custom colors, non-player based PAPI placehodlers and built-in {<value>sp} positive/negative space placeholders, that you can use to align your three textures.
Align Texture and Text
Step-by-step tutorial for aligning tooltip textures
First, fill in your texture unicode characters. Add debug: true to your tooltip config, which will help visualizing where text would naturally align in the item lore (see screenshot below).
gold:
  debug: true
  top: "\u4070"
  middle: "\u4071"
  bottom: "\u4072"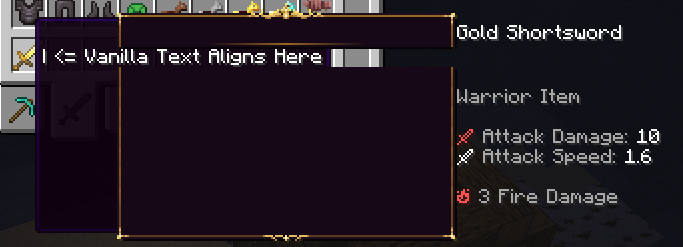
The first step is to align the leftsides of your tooltip to the left of the vanilla tooltip. I measured that there are 41px in between the two tooltip leftsides. This can be corrected by adding negative space fonts of value -41 BEFORE the tooltip texture unicode. In my case, the three textures happen to naturally align, but you might need to use different alignment values for your three textures.
gold:
  debug: true
  top: "{-41sp}\u4070"
  middle: "{-41sp}\u4071"
  bottom: "{-41sp}\u4072"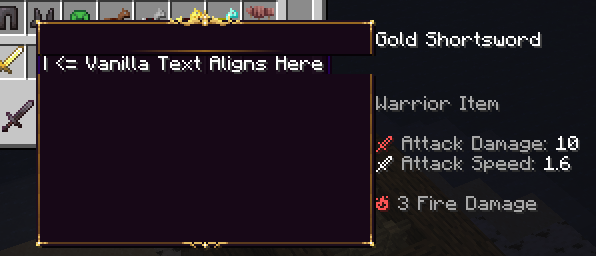
Now the vanilla and custom tooltip leftsides are perfectly aligned. We now need to align the lore text with the leftmost pixel of the debug bar | <= Vanilla Text Aligns Here. You can do that by measuring the number of pixels in between the debug bar and the leftmost pixel of the lore text. Again, alignment values might differ for the 3 tooltip textures, but mine happen to coincide. I measured 166 pixels. Again, this can be corrected by adding negative fonts AFTER the tooltip texture unicode.
gold:
top: "{-41sp}\u4070{-166sp}"
middle: "{-41sp}\u4071{-166sp}"
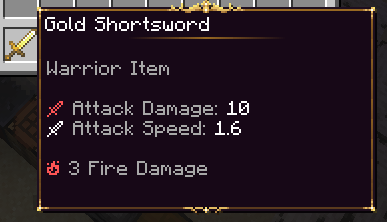
bottom: "{-41sp}\u4072"Boom! Here's how your item looks in-game, after toggling off the debug option.
align_texture is an integer; it can be used to horizontal-shift all tooltip textures at once. Usually, you want to leave it to 0 first, align all three textures using negative space, and only then shift them all at once to the left (negative value) or the right (positive value).
align_text is an integer; it can be used to horizontal-shift all lore lines and item name at once. This is usually used to account for tooltip textures which are "thicker" than others. Just like the option above, you usually want to leave it to 0, align all lore lines using negative space, and only then shift them all at once using this option. In our case, our tooltip textures are as "thick" as the vanilla tooltip so there's no need to use a non-zero value.
Displaying item type and tier
Let's now say you want to display the item type and tier right under the item name. Copy and paste the following syntax block to your tooltip config:
gold:
# ...
lore_header:
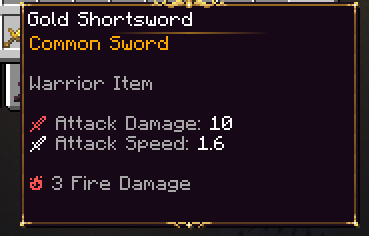
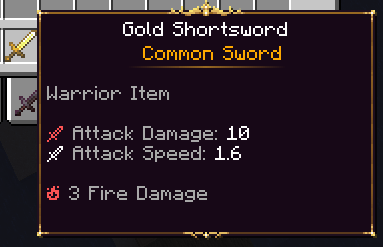
- '&6{tier} {type}'This has the effect of inserting a set amount of lines at the very beginning of the item lore, during item generation. {tier} returns the item tier, and {type} returns the item type. {tier} will always return a non-empty value: if the item has no tier, this placeholder will return the value specified in the default-tier-name option, in the main MMOItems config file. By default, this value is set to Common, which explains what you see on the following screenshot.
Centering the tooltip header
The item name, tier and type look really nice, but let's say you want the item name and first lore line to be centered horizontally. This can be achieved using a few strings and proper configuration.
gold:
  # ...
  center_top:
    display_name: true
    lore_lines: 1
    span: 161
    default_char_size: 5
    char_size: [f4, i1, k4, l2, t3, I3, "'1", ' 3', ',1', '(3', ')3']
    regex: "[a-zA-Z0-9 ',()+]"
Set display_name to true if you want to center the item display name. Otherwise, MMOItems will only format the N first lore lines.
lore_lines corresponds to the amount of lines that you want centered. Here, we want to set this value to 1, because we need our lore header (that we added in the previous section) centered. By default, it is set to 0, in which case MMOItems will only center the item name (if display_name is toggled on).
The technical part...
Before moving to the other options, you need to understand how MMOItems manages to have centered texts. This is not possible in vanilla Minecraft, however it can be achieved by offseting any text by the right amount of pixels, using positive-space fonts. Let's say your tooltip is tooltip_width pixels wide, and that you want to center a text of length text_length. You can do that by offseting your text to the right by the following amount:
offset_to_center = (tooltip_width - text_length) / 2This is exactly the computation that MMOItems does. In order to do that, it needs two values: the length of text, and width of tooltip. You have to provide the tooltip width, in pixels. You can measure it in Photoshop or any other image edition software. It is the number of pixels between the leftmost pixel of the leftmost character in your in-game string, and the rightmost pixel where you want text displayed.
The length of text is harder to compute. One could wish it is as easy as multiplying the number of characters per the number of pixels per character. Unfortunately, not all characters are born equal - some are wider and some use less pixels. Actually, the width of a character is a client-side property, and depends also on the font (resource pack used). Therefore, if you plan on using centered tooltip headers, make sure the font used in your item names are included in your server resource pack, to make sure all players use the same font pack.
MMOItems need to evaluate the length, in pixels, of any string. For that, it needs to know the font size, which is the width of any character. It turns out that, using the default resource pack, the width of most characters is 5, which is why default_char_size is set to 5. However, there are a few exceptions, which are indicated in the char_size array. Here are a few examples:
- lowercase
fis only 4px wide - lowercase
iis 1px wide, whereas uppercaseIis 3px - space character
happens to be 3px
If you plan on using the default Minecraft font, you don't need to bother about these as we have already measured most of them for you. If you plan on using a different font for your server resource pack, you will have to open an image editing software, and count the pixels of any character that you plan on using inside your item names.
Finally, the regex is the regex expression for characters that should be taken into account when counting the width of a given line. If a character is found inside a lore line and does not match this regex, it will simply be ignored. This is typically used to avoid counting unicode characters used in custom fonts and color codes. Doing a regex tutorial here would be very much out-of-scope, so please look it up online if you don't know about it. The default value is set to include lowercase and uppercase roman litterals, commas, +'s and brackets (used when upgrading items) and spaces.
INFO
This option is subject to change in the future if we find a better way/less confusing way to implement this
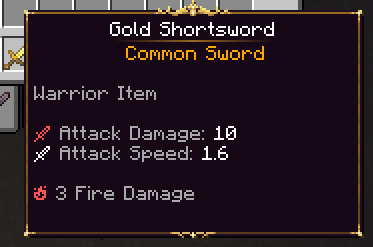
Here's what our item looks like so far! We have successfully centered our display name and first lore line.
Making the tooltip top larger
Our tooltip looks pretty good so far, but there might one thing you still want to do. As of right now, you might want to increase the size of the tooltip header. The first thing that you want to do is draw a new texture for your tooltip. Here's the new texture, that will occupy the item name level, as well as the first lore line. Our new texture is now 42px high.

Make sure you update the resource pack config to account for the height of your new tooltip top texture. I had to increase height from 21 to 42, and ascent from 17 to 18 for a very minor 1px adjustment.
{
    "providers": [
        {
            "type": "bitmap",
            "file": "tooltip_tutorial:gold/top.png",
            "ascent": 18,
            "height": 42,
            "chars": ["\u4070"]
        },
        ...
    ]
}
Now use the following syntax for your tooltip config. The ignore_first option tells MMOItems to skip the rendering of the middle texture for the two first lore lines, which are now covered by your larger tooltip top texture!
gold:
  # ...
  ignore_first: 2
Here's the final look of our item. Pretty nice!
Binding tooltips to items, modifiers, tiers, types
Binding a specific tooltip to a specific item is super easy. Either directly input the tooltip ID after clicking the Tooltip option in the item edition UI, or use the following syntax. This option has precedence over type- and tier-level tooltips.
SOME_ITEM:
  # ...
  tooltip: GOLD # Forces the tooltip to GOLD
Similarily, you can have modifiers that apply a tooltip (just like they would give any other stat/item option) using the following syntax. This option has the highest precedence, since modifiers are taken into account after the base item data on item generation. Here's an example of a modifier that adds the prefix Golden to items while applying tooltip with ID GOLD.
GOLDEN:
  chance: 0.1
  prefix:
    format: '&6Golden'
    priority: 1
  stats:
    # ...
    tooltip: GOLD # Forces the tooltip to GOLD
Binding tooltips to item tiers is super easy as well. Here is the default config of the Rare item tier. This option has precedence over type-speficic tooltips, but not over item- or modifier-level tooltips.
RARE:
  name: '&6Rare'
  # ...
  tooltip: GOLD # Sets default tooltips of Rare items to GOLD
Binding tooltips to item types is also super easy using the following syntax. Here's the default config file of the Sword item type. This option has the lowest precedence.
SWORD:
  name: Sword
  # ...
  tooltip: GOLD # Sets default tooltip of swords to GOLD